iSCSI stands for "Internet Small Computer Systems Interface". iSCSI is an extension of the standard SCSI storage interface that allows SCSI commands to be sent over an IP based network. It enables computers to access iSCSI targets over a network the same way they would access a drive that is directly connected to a computer.
The Microsoft iSCSI initiator will be used to connect to an iSCSI target from a Windows 7, 8, or other Windows PC. The iSCSI initiator can connect to an iSCSI target by the Seagate NAS hostname or by IP address. If you have decided to connect by IP address, Seagate recommends you setup the NAS with a static IP address in advance.
How to set up a static IP on the NAS
- Access the administrator's page of the Rackmount NAS by launching the Seagate Network Assistant and pressing the Web access to the NAS OS Dashboard button, or by typing the IP address of the device in the address bar of a web browser.
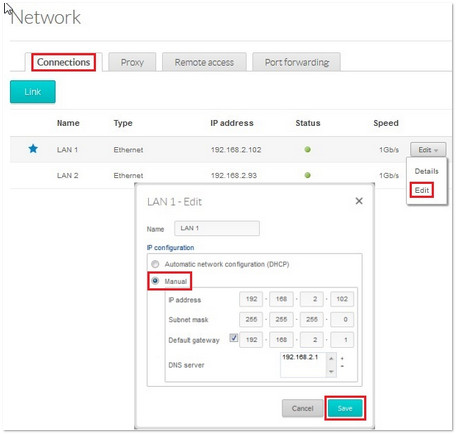
- Under Settings on the left sidebar, select Network.
- Select the Connections tab.
- In the row representing the primary LAN connection, move your mouse over the Edit dropdown menu and select Edit.
-
Change the IP configuration to Manual and click Save.
Creating the iSCSI target
-
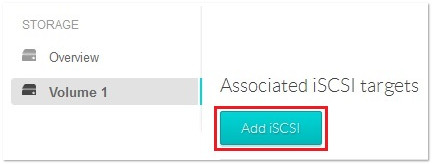
Under Storage on the left sidebar, select the volume, then select Add iSCSI.
-
Set the capacity and Advanced parameters (optional) and select Next.
iSCSI targets are limited to 8TB.
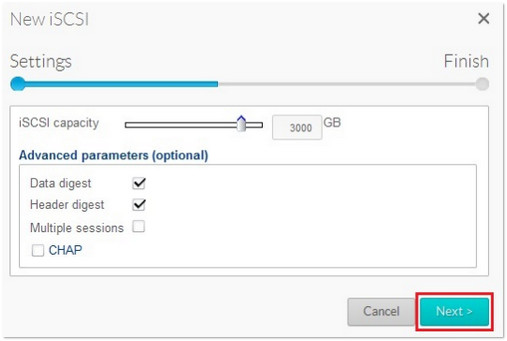
A note on iSCSI “Advanced parameters (optional)”:- Header Digest - Increases data integrity. It ensures the validity of the header portion of the protocol data unit.
- Data Digests - Increases data integrity. Validate the data segment of the protocol data unit.
- Multiple Sessions - This is for multiple connections to a single iSCSI target. To avoid data corruption or loss, make sure you are operating in a cluster environment.
- CHAP (Challenge Handshake Authentication Protocol) - Allows one-way and mutual CHAP to authenticate with the Microsoft iSCSI initiator and the target.
-
Click Finish to confirm the selections.
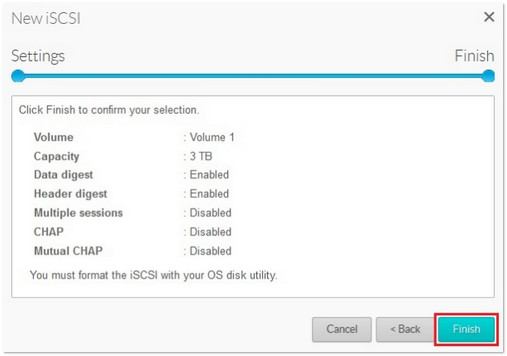
When the iSCSI target has been created, it will show as disconnected. An Edit dropdown menu is available to delete the iSCSI target or to edit its settings.

Connecting to the iSCSI target
-
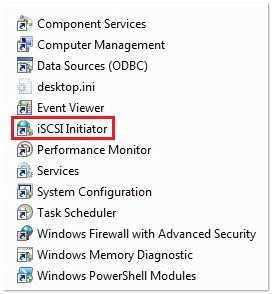
Move to a workstation on the local network that will connect to the new iSCSI target. Open the Control Panel, select Administrative Tools, and open the iSCSI Initiator.
In this example we will connect to the iSCSI target by hostname.
The hostname can be found at the top left of the NAS Manager page.
The iSCSI drive is now ready to use.
-
Enter the NAS hostname (or IP Address) in the Target: field and click Quick Connect...
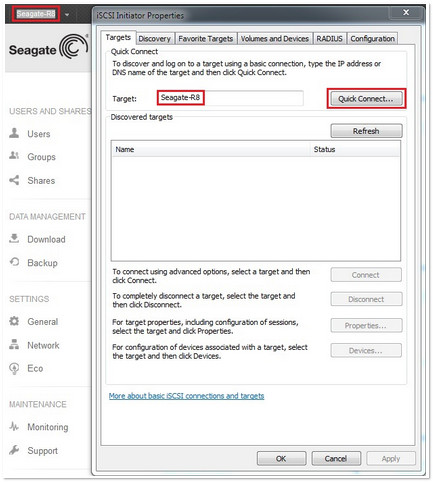
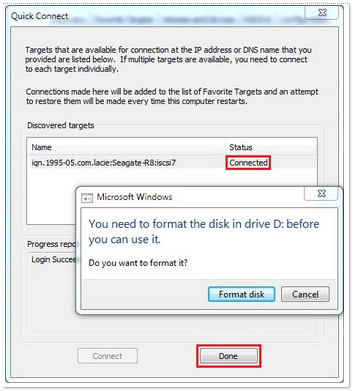
The Quick Connect window will open and display as Connected. Windows may prompt that "You need to format the disk in drive..." - Select Format disk.
-
Click Done and OK to exit the the initiator.