The Domain Name System (DNS) enables you to have a domain name for such as www.seagate.com instead of having to remember an IP Address like 70.165.75.155.
Dynamic DNS can be used to remotely access the Seagate NAS using FTP / WebDAV or other protocols.
Setup Procedure
Please follow this procedure to setup the Seagate Business NAS with its Dynamic DNS feature:
- Go to one of the following two sites to set up an account and create a Domain Name.
http://www.noip.com/
http://dyndns.com/
This Domain Name will be linked to your Internet IP address that is provided to your modem/router by your Internet Service Provider.
 A dyndns account was used in this example.
 - Log into Seagate NAS Manager using Seagate NAS Discovery or by entering the IP address of the NAS device in the address bar of a web browser.
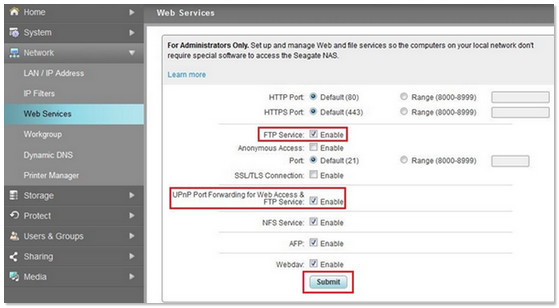
- From the left sidebar, select Network, then Web Services.
- Check the box next to Enable the FTP Service and Enable UPnP Port Forwarding for Web Access & FTP Service.
- Click the Submit button.
- From the left sidebar, select Network, then Dynamic DNS.
- Select dyndns.com or no-ip.com from the DNS Server: dropdown menu.
- Type in your new Domain Name in the (URL): field.
- Enter the Username and Password that was created when you setup the dyndns or no-ip account.
- Click the Save button.

Dynamic DNS is now setup with the Seagate NAS.
The Share can be accessed remotely using a browser or third-party FTP applications.
Use case example
Short for File Transfer Protocol, the FTP protocol is used for exchanging files over the Internet. In this example, we will be using WinSCP and Filezilla. These are for demonstration purposes only. You can choose the FTP client according to your preference. Please note that while we use these two as example, Seagate does not provide direct support for WinSCP or Filezilla.
Example using WinSCP
- Download and install WinSCP.
- Open WinSCP and select New.
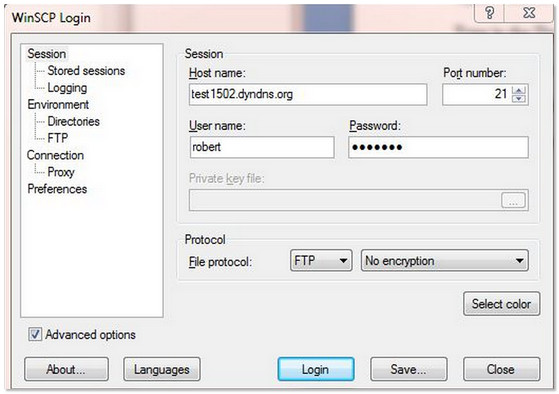
The WinSCP Login page opens. - Enter the following information:
- Host name: Type in the Domain / Hostname that was created from dyndns.com or no-ip.com.
- Port number: The default value should be 21.
- User Name: and Password: Type in a User Account Name and Password that is attached to a shared folder that has already been created on the Seagate Business NAS.
- File Protocol: Select FTP.
- Click Login.
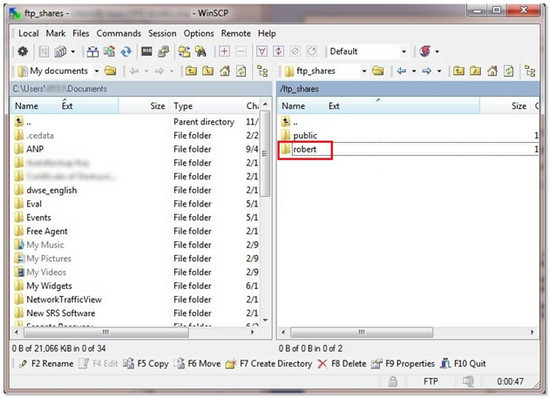
The share on the Seagate Business NAS is now available for access.
Example Using FileZilla to remotely access the Seagate NAS using Dynamic DNS
- Download and install FileZilla.
- Open FileZilla.
In this example we will be using FileZilla Quickconnect. - Follow these parameters for configuration:
- Host: Type in the Domain Name.
- Username: and Password: Type in the Username and Password that would be used to access the private share on the NAS.
- Port: 21 (which is typically the default for FTP.)
- Click the Quick Connect button.

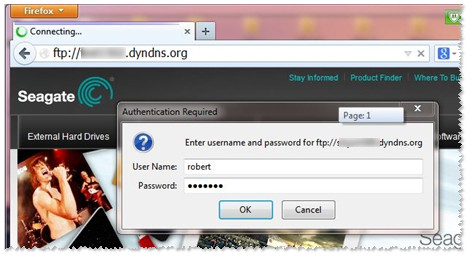
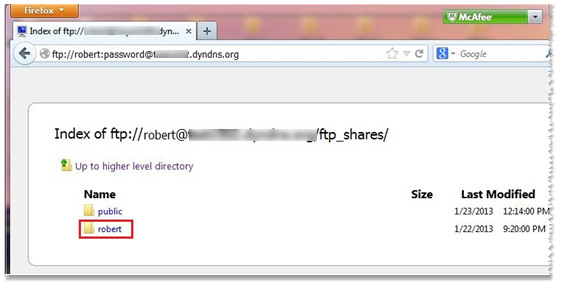
Downloading Files Remotely Using a Web Browser
A web browser can be used to download files from the Business NAS remotely. In this example we will use Firefox.
- Open Firefox.
- In the address bar, type:
ftp://username:password@domain name
This would be the same username and password for a private share on the Seagate NAS.
Example:
ftp://robert:*******@test****.dyndns.org
Alternatively, you may type the domain name only, without specifying a Username and Password:
ftp://domain name
The browser will prompt for the Username and Password.
Enter the information, then click the OK button.