


A Domain is a group of computers administered as a single unit from a central location. The Seagate Business NAS can be setup as a Domain member.
The Domain's administrator must authorize the Seagate Business NAS as a Domain member. As the administrator, you must know the Domain administrator’s username and password to add your NAS to a Domain. Once the Seagate Business NAS joins the Domain, you can assign shared folder permissions on the NAS to the ADS users and group organizations imported from the Domain.
- Log into Seagate NAS Manager using Seagate NAS Discovery or by entering the IP address of the NAS device in the address bar of a web browser.
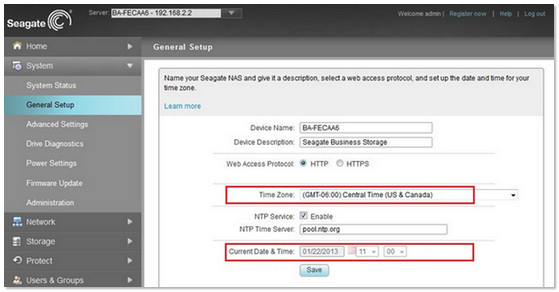
- Ensure that the Seagate Business NAS Time, Date, and Time Zone are correct:
- Under System in the left sidebar, select General Setup.
- Ensure the Time, Date, and Time Zone match the Domain Controller’s Time, Date, and Time Zone.
- From the left sidebar, select Storage, then Shared Folders.
- Create a Share.
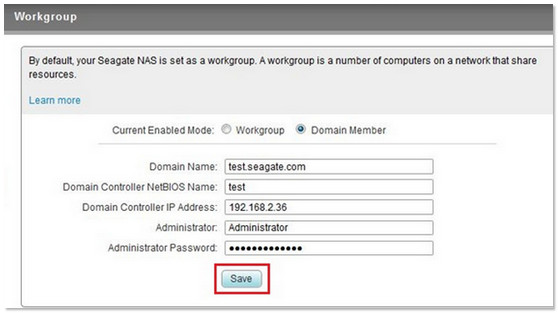
- From the left sidebar, select Network, then Workgroup.
- Configure the settings as follows:
- Current Enabled Mode: Domain Member
- Domain Name: Enter the FQDN (Fully Qualified Domain Name). Typically, the Domain name is similar to the DNS Domain name.
In the example of www.seagate.com, www is the host, seagate is the second-level Domain, and .com is the top level Domain. - Domain NetBIOS Name: Enter the shorter name of the Domain. Typically, it's the first part of the full Domain name.
- Domain Controller IP Address: Enter the IP Address of an Active Directory (AD) Domain controller of the Domain you wish to join.
- Administrator User Name and Administrator Password: Enter the Domain administrator username and password.
If the correct information was entered into the fields above and saved, an alert will display momentarily: "Successfully Updated".
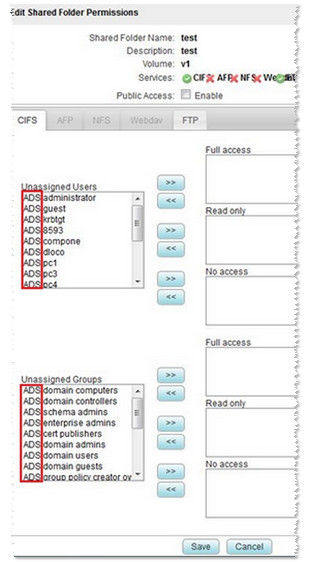
The text in the fields will dim at this point. - From the left sidebar, select Users & Groups, then Shared Folder Permissions.
- Click the Edit Actions icon next to a Shared Folder. Now there displays a list of Domain Users and Groups under the Unassigned Users and Unassigned Groups fields.
Active Directory Users and Groups will be listed beginning with ADS.
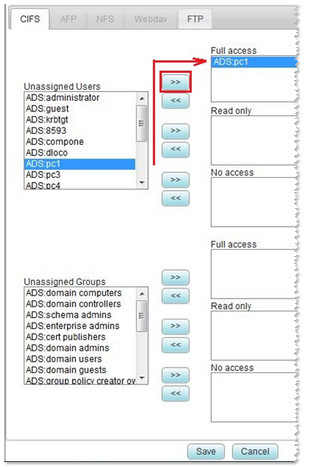
- To assign permissions to an Active Directory User, highlight one of the Unassigned Users and click the arrow button next to one of the appropriate rights, such as Full Access.
When assigning an ADS User to a permission field Such as Full Access or Read Only, it is moved into that field and will no longer be visible as an Unassigned User. There are only 3 permissions available for shares on the Seagate Business NAS. - Other ADS users can be given permission for this Share.
After Shared Folder Permissions have been set, click the Save button at the bottom of the page.
After the Seagate Business NAS has joined the Domain, Domain users can be assigned not just to normal shares but also to external USB or USM drives connected to the NAS.
With a USB or USM drive connected to the Seagate Business NAS login to the Dashboard:
- From the left sidebar, select Users & Groups, then USB Share Permissions.
- Click the Edit icon to the right of the USB or USM Port Name.
- Remove the check from Public access: to view the Unassigned Users and Groups.
- Highlight an unassigned user or group and use one of the arrow buttons that points to one of the permissions: Full access, Read only, or No Access.
